Building your own retro arcade cabinet at home involves careful planning, selecting suitable materials like MDF or reclaimed wood, and using the right tools such as saws and drills. You’ll need to measure, cut precisely, sand, and assemble panels, then install electronics, controls, and lighting for a personalized touch. Ensuring safety and stability is essential. If you want detailed steps and tips, you’ll discover how to craft a unique arcade experience with simple guides to follow.
Key Takeaways
- Plan your cabinet design using blueprints, choosing size, orientation, and custom features aligned with space and game preferences.
- Gather materials like MDF, screws, and electronics; use appropriate tools and measure carefully for precise cuts and assembly.
- Assemble panels securely, ensuring accurate cuts, proper sanding, and safety precautions to create a stable, professional-looking cabinet.
- Install electronics including monitor, controls, speakers, and lighting; wire components securely and customize artwork for visual appeal.
- Conduct safety checks, reinforce joints, organize wiring, and perform maintenance to ensure a durable, safe, and functional arcade cabinet.
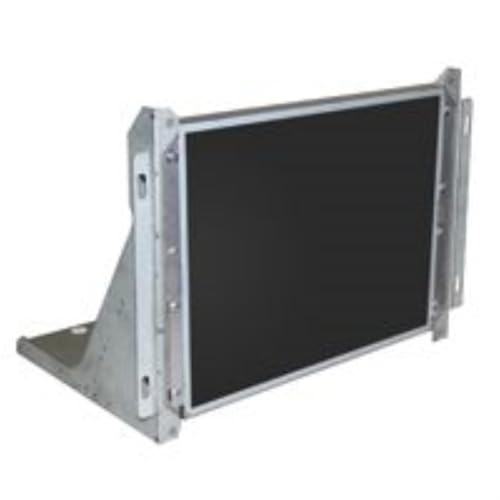
19 Inch Arcade Game CRT Monitor Retro Frame Kit
Arcade Game Montior Mount
As an affiliate, we earn on qualifying purchases.
As an affiliate, we earn on qualifying purchases.
Planning Your Arcade Cabinet Design

Before building your arcade cabinet, it is essential to plan its design carefully. First, decide on the cabinet type—full-size, bartop, or mini—based on your space and the games you want. Use free online blueprints or CAD plans to get accurate measurements and cut lists, ensuring precision during assembly. Early on, determine the monitor size and orientation—vertical or horizontal—to match your gaming preferences. Consider custom features like marquee lighting, control decks, and speaker placement to enhance your cabinet’s look and functionality. Label all panels (A, B, C, etc.) during the planning stage to prevent confusion later. Proper planning saves time, reduces waste, and helps you build a sturdy, functional arcade cabinet tailored to your gaming style. Additionally, understanding projector types can assist in selecting the right display setup if you plan to incorporate a projector for a larger screen experience. Incorporating energy-efficient components can also help reduce power consumption and make your arcade setup more sustainable. Reviewing planning frameworks can guide you through the process of organizing your design steps effectively. Moreover, choosing appliances with smart home integration features can enable remote control and automation for your gaming setup, adding convenience and modern flair. Considering component compatibility early on ensures that all parts work seamlessly together, preventing future issues.
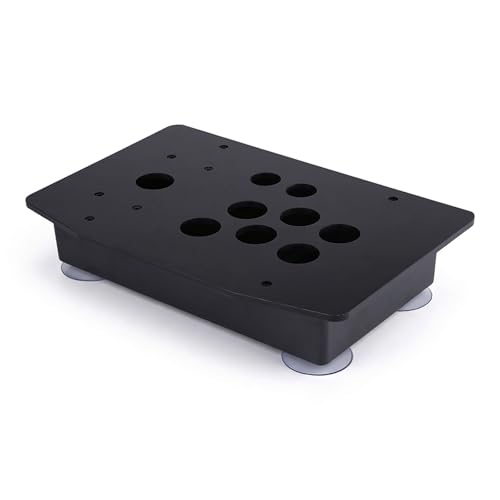
Yuecoom Arcade Cabinet Kit, Arcade Cabinet, Arcade Case, DIY Arcade Controller Case, Black Acrylic Panel and Case DIY Set Kits Replacement for Arcade Game
DIY Parts Set: The arcade game console has installed screws, silicone feet, plastic box, arcade cabinet can help…
As an affiliate, we earn on qualifying purchases.
As an affiliate, we earn on qualifying purchases.
Selecting the Right Materials and Tools

Choosing the right materials and tools is essential for building a durable and professional-looking arcade cabinet. Start with common materials like 15mm MDF for panels, 2x4s for framing, and sturdy screws. Reclaimed wood or pallets work for budget builds. Essential tools include a saw (circular, jigsaw, or table), drill, clamps, measuring tape, and sandpaper. An optional brad nailer or hole saw can simplify assembly and control installation. Always measure twice before cutting to minimize waste. Use a sharp blade for clean cuts and proper tools to guarantee precision. Keep your workspace organized and safety gear handy. Selecting quality materials and reliable tools will make your build easier, faster, and result in a more polished, long-lasting arcade cabinet. Additionally, considering material durability can help ensure your cabinet withstands regular use and aging over time. Incorporating professional-grade tools can further enhance the quality and efficiency of your build process. Using precision measuring devices is also recommended to improve accuracy and reduce errors during assembly. To further improve your project, integrating proper safety equipment is crucial for a secure and injury-free workspace. Being aware of material properties, such as weight and resistance to wear, can contribute to choosing the best components for longevity.

LVL23 2 Player Bartop Arcade Cabinet Kit for 19" to 23" Screens (HAPP or SANWA) (SanwaALL30 (Sanwa joys, 28mm or 30mm buttons))
Dimensions (approx.): Interior Width: 20.75", Exterior Width: 21.75”, Exterior Height: 21”, Exterior Depth: 18”
As an affiliate, we earn on qualifying purchases.
As an affiliate, we earn on qualifying purchases.
Cutting and Preparing Cabinet Panels

To get precise cuts, you need to use accurate measurement techniques and double-check your markings before cutting. Always prioritize safe cutting practices by wearing protective gear and securing your panels firmly. Proper planning guarantees your cabinet panels fit perfectly and reduces mistakes during assembly. Incorporating visual and auditory cues can also aid in achieving accurate cuts and aligning your components properly. Additionally, understanding the importance of measurement accuracy can help prevent costly errors and ensure a professional finish. Being aware of flight hours and experience requirements can also inform your planning process to ensure your project aligns with your skill level and resources. Recognizing the role of effective planning and safety in DIY projects can further enhance your results and ensure a smooth building process. Moreover, adhering to recommended maintenance and cleaning routines for your tools can extend their lifespan and improve the quality of your work.
Accurate Measurement Techniques
Accurate measurement is the foundation of a well-constructed arcade cabinet, guaranteeing all panels fit together seamlessly. Begin by double-checking your blueprints or plans, and use a reliable measuring tape or ruler. Mark your cut lines clearly with a pencil, and verify measurements twice before making any cuts. Use a square or straight edge to draw precise, straight lines for cutting. When measuring complex angles or curves, take your time and use a protractor or angle finder. Consistently measure from the same reference points to avoid errors. Keep your tools sharp and well-maintained to ensure clean cuts. Precision in measurement minimizes waste and reduces the need for adjustments during assembly, leading to a more professional and durable cabinet. Additionally, practicing measurement accuracy throughout the process helps ensure your finished cabinet is both sturdy and visually appealing. Incorporating calibrated tools can further improve your measurement consistency and overall project quality.
Safe Cutting Practices
Before cutting your cabinet panels, it’s essential to guarantee safety to prevent injuries and ensure precise results. Always wear safety goggles and hearing protection when operating saws or drills. Keep your workspace clean and free of clutter to avoid accidents. Use a sharp blade or bit; dull tools can slip and cause injuries. Secure panels firmly with clamps or a vise to prevent movement during cutting. Mark your cut lines clearly, and double-check measurements before proceeding. Cut slowly and steadily, following your marked lines without rushing. Keep your hands away from the blade path and never force the saw. Turn off and unplug tools when changing blades or adjusting settings. Proper tool maintenance is crucial for safe and effective cutting. Prioritize safety at every step to protect yourself and achieve clean, accurate cuts.
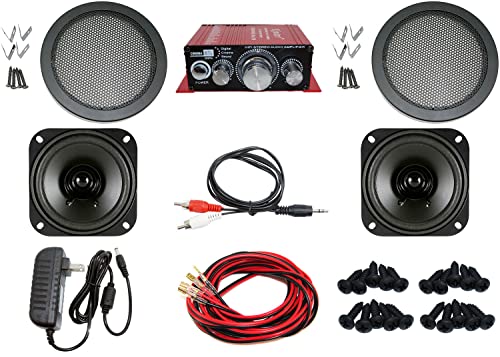
Audio Kit for Arcade Game, MAME Cabinet, or Virtual Pinball Machine
1 Kinter Stereo Audio Amplifier (18w per channel, Bass & Treble adjustments)
As an affiliate, we earn on qualifying purchases.
As an affiliate, we earn on qualifying purchases.
Assembling the Main Structure

Assembling the main structure is a crucial step that sets the foundation for your arcade cabinet’s stability and durability. Begin by carefully aligning the side panels with the base, ensuring all edges are flush. Use clamps to hold pieces in place, then drill pilot holes before inserting screws—this prevents wood splitting. Attach the side panels securely to the base, then reinforce with cross supports or internal braces for extra stability. Make sure your monitor support and back panel are positioned correctly before fastening them in place. Take your time to verify measurements and alignments; precision here makes assembly smoother and results in a sturdy cabinet. Additionally, consider structural integrity by checking the overall frame for any weak points or wobbling during assembly to ensure long-term stability. Once the main frame is assembled, double-check all joints for tightness before proceeding to the next steps. safety checklists such as ensuring proper placement and secure connections help to avoid hazards during use.
Sanding, Filling, and Painting the Frame

Once you’ve assembled the main frame, the next step is to prepare its surface for finishing. Start by sanding all panels with medium-grit sandpaper to smooth rough edges and remove splinters. Follow with fine-grit sandpaper for a polished surface. Fill any screw holes, dents, or imperfections with wood putty, then sand those areas smooth once dry. Wipe the entire frame with a damp cloth to remove dust. If you’re painting, apply a primer suitable for MDF or wood, ensuring an even coat. Once primed, sand lightly to eliminate brush marks or uneven spots. Then, proceed to paint with your chosen color, applying multiple thin coats. Sand lightly between coats for a smooth, professional finish. Let each coat dry thoroughly before moving on. Using a high-quality airless paint sprayer can help achieve an even, smooth finish with less effort and fewer brush marks. Additionally, choosing the right paint type can enhance durability and appearance of your arcade cabinet. To ensure a durable and professional finish, consider the appropriate surface preparation techniques before painting. Proper surface preparation is essential for long-lasting results and a professional look.
Installing Electronics and Controls

Installing electronics and controls requires careful planning to guarantee all components function seamlessly. First, decide on your control layout, such as a 6-button setup or joystick configuration. Mark and drill button holes using a 30mm hole saw, applying a reverse drill tip to prevent tear-out. Next, wire the buttons and joystick to your arcade PCB or Raspberry Pi with RetroPie, ensuring secure connections. Mount the monitor firmly and organize cables to prevent tangling. Finally, install speakers and marquee lighting for enhanced effects. Incorporating sound healing science principles, such as using specific frequencies in your setup, can further enhance the sensory experience.
Customizing With Artwork and Lighting

Enhancing your arcade cabinet with artwork and lighting transforms it from a simple project into a striking centerpiece. Start by applying custom decals or painted designs that reflect your style or favorite games. Use high-quality adhesive for a smooth finish and consider lamination for durability. Incorporate LED strip lights around the edges or behind the monitor to add vibrant illumination and ambiance. You can also install spotlights or marquee lighting to highlight artwork or control panels. Choose colors and lighting patterns that complement your cabinet’s theme for a cohesive look. Carefully conceal wiring for a clean appearance and ensure all lighting is securely mounted. This customization not only boosts visual appeal but also creates an immersive gaming environment you’ll be proud to showcase.
Final Assembly and Safety Checks

As you finish assembling your arcade cabinet, it’s essential to prioritize electrical safety and guarantee everything is properly grounded. Double-check the stability of all panels and locking mechanisms to prevent accidents during use. Taking these safety precautions will help you enjoy your arcade confidently and securely.
Electrical Safety Precautions
Before finalizing your DIY arcade, it’s crucial to prioritize electrical safety to prevent accidents and guarantee reliable operation. You must double-check wiring connections, ensuring all are secure and insulated. Use a multimeter to test for shorts or grounding issues before plugging in. Always turn off power when working on wiring to prevent shocks. Keep cords organized and away from moving parts or moisture. Consider installing a circuit breaker or fuse for added protection. Here are key safety precautions:
- Verify all wiring is properly insulated and grounded
- Use appropriate fuses and circuit breakers
- Test all connections with a multimeter before powering up
- Keep cords tidy and away from water or heat sources
- Turn off power before performing any wiring adjustments
Following these steps minimizes risks and ensures a safe, durable arcade build.
Stability and Locking
Ensuring your arcade cabinet is stable and securely locked together is essential for safety and durability during gameplay. Start by double-checking all joints, making sure screws and wood glue hold panels firmly in place. Reinforce critical connections with metal brackets or aluminum angle braces, especially at the base and monitor support. Use clamps to hold joints tight while the glue dries. Attach the back panel securely with multiple screws to prevent shifting. Consider adding self-adhesive feet or leveling pads at the bottom to prevent wobbling on uneven surfaces. For mobility, install wheels with locking casters. Regularly inspect all fasteners and joints, tightening or replacing as needed to prevent accidents or damage during extended use. Proper locking and stability ensure a safe, long-lasting arcade experience.
Tips for Maintaining and Upgrading Your Arcade

Maintaining and upgrading your arcade regularly keeps it running smoothly and looking great. To stay on top of upkeep, start by cleaning the monitor, controls, and cabinet surfaces with gentle cloths and appropriate cleaners. Check wiring connections and replace any frayed or loose cables. Keep software updated to ensure compatibility with new games or features. Consider upgrading components like speakers or adding LED lighting for a fresh look. You might also want to retrofit controls or install new artwork for a personalized touch.
Regular maintenance and upgrades keep your arcade running smoothly and looking great.
- Regularly clean and inspect internal wiring and controls
- Replace worn or damaged parts promptly
- Upgrade lighting and audio components for better aesthetics
- Update software or firmware for improved functionality
- Repaint or add custom artwork for a refreshed appearance
Frequently Asked Questions
How Do I Choose the Best Monitor Size for My Cabinet?
You should choose a monitor size based on your cabinet’s dimensions and the types of games you want to play. For full-size cabinets, a 19-27 inch monitor works well, while smaller cabinets benefit from 13-17 inches. Consider whether you want a vertical or horizontal orientation since it impacts your game selection. Balance screen size with your space, and make sure it fits comfortably without crowding other components.
What Are the Ideal Dimensions for a Mini Arcade Cabinet?
Sure, the ideal dimensions for a mini arcade cabinet are roughly 24-30 inches tall, 15-20 inches wide, and 15-18 inches deep—perfect for cramped spaces and big personalities. You’ll want it compact but functional, with enough room for a small monitor, controls, and some flair. Remember, it’s all about balancing comfort and style, so don’t be afraid to tweak these measurements to fit your space and gaming dreams.
How Can I Make My Arcade Cabinet Mobile and Easy to Move?
To make your arcade cabinet mobile and easy to move, add wheels or casters to the base. Choose sturdy, lockable casters for stability and safety. Confirm the wheels can support the weight of your cabinet and electronics. Mount them securely using screws or bolts, and consider adding handles on the sides for easier lifting or maneuvering. This way, your cabinet becomes portable without sacrificing stability or durability.
Which Wiring Techniques Ensure Reliable Control Button Connections?
Secure control button connections with soldering; it’s the best way to guarantee reliability. Don’t rely solely on crimp connectors or push-in terminals—they can loosen over time, causing glitches or unresponsive buttons. Soldering creates a solid, permanent bond that withstands vibrations and movement. Wrap connections with heat shrink tubing for insulation and strain relief. This method guarantees your arcade controls stay responsive and reliable during endless gaming sessions.
What Safety Precautions Should I Follow During Assembly and Electrical Work?
During assembly and electrical work, you should wear safety glasses to protect your eyes from debris, and use insulated tools to prevent shocks. Make sure your workspace is well-ventilated and keep a fire extinguisher nearby. Turn off power when wiring and double-check connections before powering on. Avoid rushing, and follow all manufacturer instructions carefully. Keep cords organized to prevent tripping hazards, ensuring a safe and smooth build process.
Conclusion
Building your own arcade cabinet isn’t just a fun project — it’s a way to bring classic gaming into your home. Some say DIY projects can boost creativity and problem-solving skills, and science suggests working on hands-on tasks like this actually sparks your brain. So, as you finish your cabinet, remember: you’re not just creating a game space, you’re also giving your mind a playful, nostalgic workout. Happy gaming and building!