
TL;DR
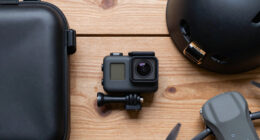
A closet can become a surprisingly good space for recording or AI work if you focus on reducing reflections and noise leaks. Moving the rig away, treating first reflection points, and sealing gaps make the biggest difference, while foam alone won’t block outside noise.
Imagine turning a tiny closet into your personal sound booth or AI rig hub. The secret isn’t just buying foam panels or sealing gaps; it’s about smart placement and understanding how sound behaves in tight spaces.
This guide reveals how to make the most of a small space, focusing on practical tips that actually work — from where to place your panels to how to keep noise from leaking out. You might also find acoustic dampening tips helpful. Whether you’re recording vocals, podcasts, or running a quiet AI server, these tweaks can transform your makeshift closet into a surprisingly effective setup.
Acoustic dampening
& the rig in the closet.
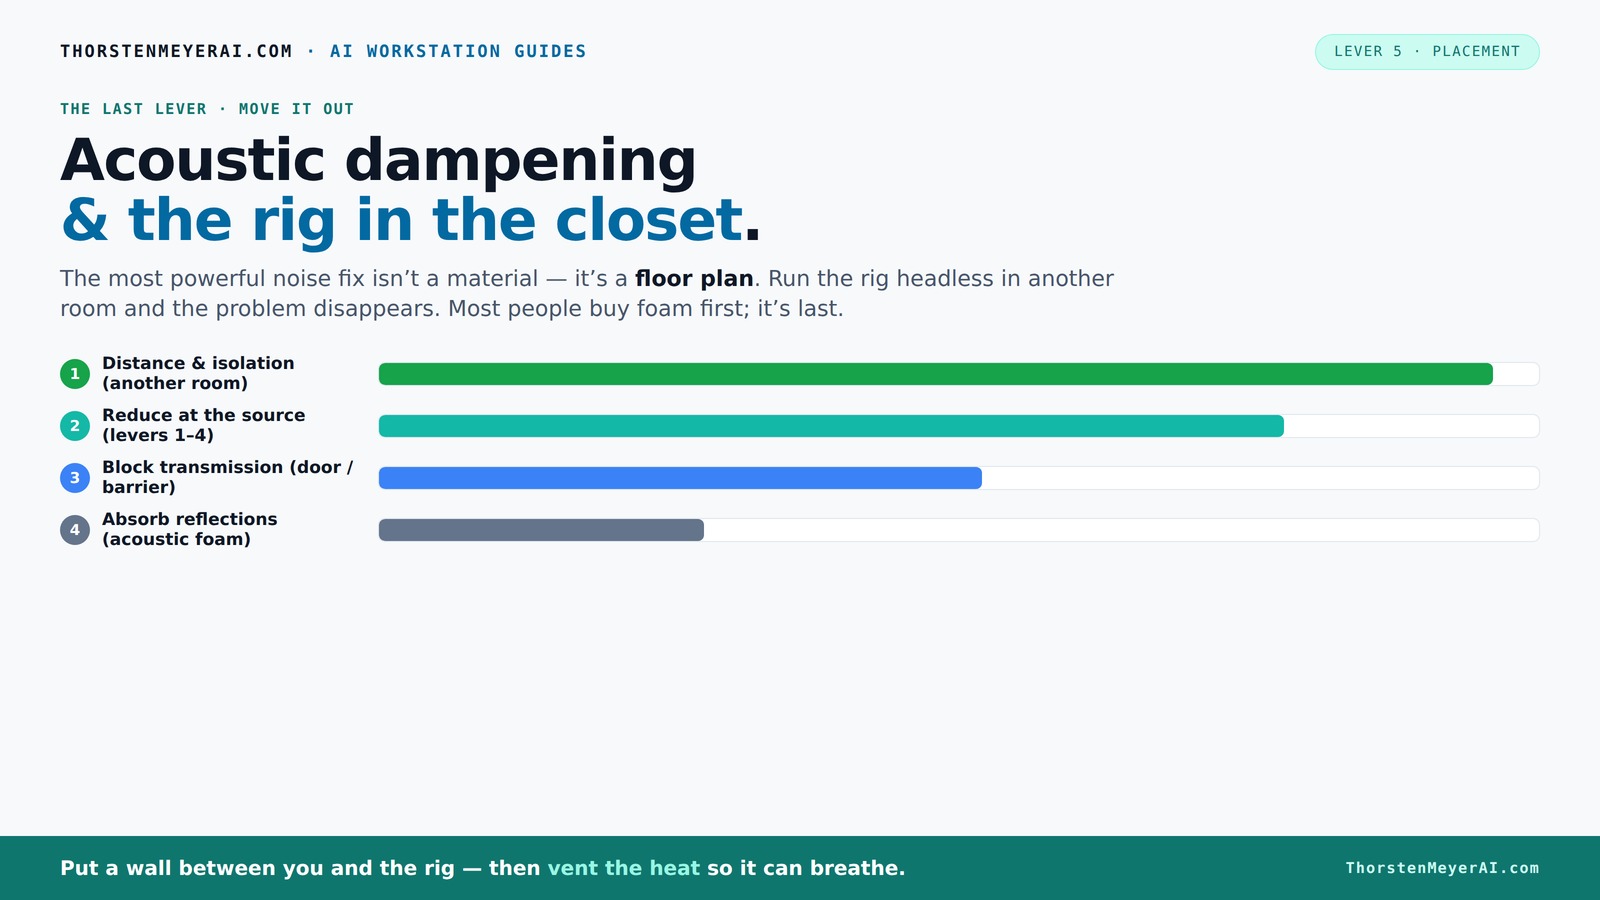
The most powerful noise fix isn’t a material — it’s a floor plan. A rig you can’t hear because it’s in another room beats any amount of foam. Tap the approaches in Part 1 to see what actually works.
(another room)
(levers 1–4)
(door / barrier)
(acoustic foam)
Contain the noise, not the heat
Key Takeaways
- Treat the first reflection points with foam or panels; use the mirror trick to find them easily.
- Sealing gaps around the door drastically reduces outside noise leaks, improving overall sound quality.
- Moving your rig into a closet and running it headless offers the best noise reduction without complex treatment.
- Use bass traps in corners if you notice muddy, boomy sound—especially in small, enclosed spaces.
- Prioritize ventilation when placing a hot, high-power machine in a closet to prevent overheating and noise from fans.

Focusound 52 Pack Acoustic Foam Panels 1" x 12" x 12" Sound Proof Foam Panles Soundproofing Noise Cancelling Wedge Panels for Home Office Recoding Studio with 300PCS Double-Side Adhesive
Soundproofing - Acoustic foam panels triangular grooves structure for better noise absorption, helps to reduce and absorb unwanted...
As an affiliate, we earn on qualifying purchases.
As an affiliate, we earn on qualifying purchases.
Why a Closet Can Be a Game-Changer for Your Setup
Closets are often overlooked, but they offer a unique advantage: they’re enclosed, small, and can be easily modified. They naturally dampen sound reflections inside, especially when you treat the surfaces.
Take the example of a musician recording at home. Moving into a closet cut their echo by over 50%, making vocals much cleaner. For more insights, see how to optimize your acoustic setup. For AI rigs, a closet can contain the noise, keeping your space quiet while the hardware roars behind the door.
It’s all about turning a space that’s usually noisy or echoey into a controlled environment—without blowing your budget or tearing down walls.

Aokeo Microphone Isolation Shield, Foldable Mic Shield with Triple Sound Insulation, Reflection Filter with 3/8" and 5/8" Mic Threaded Mount for Recording Studio, Podcasts, Singing, and Broadcasting
The Microphone Isolation Shield features a sound-proof foam front and a ventilated metal back panel to eliminate noise...
As an affiliate, we earn on qualifying purchases.
As an affiliate, we earn on qualifying purchases.
What a Closet Can’t Do: Limitations You Must Know
A closet isn’t a soundproof room. It can reduce echoes and some noise, but it won’t block outside sounds like street noise or neighbors’ chatter. Think of it as managing reflections rather than full isolation.
For example, even the thickest foam panels won’t stop your neighbor’s lawnmower or street sirens. They primarily improve inside sound quality, making recordings clearer and reducing harsh echoes. Learn more about lighting and acoustic technology to enhance your space.
If your goal is complete silence, a closet alone isn’t enough—consider combining it with better sealing and possibly a dedicated soundproof enclosure.

118” Wedge-Shape Foam Window Weather Stripping Door Seal Strip,Soundproofing Frame Winter Insulation Tape for Exterior Front Door,Noise Cancelling Window Inserts,Door Gap Filler Light Blocker,White
Upgraded Wedge Design: This window draft stopper features an upgraded wedge design, tapering from 5/32" to 11/32" (0.16"–0.35")...
As an affiliate, we earn on qualifying purchases.
As an affiliate, we earn on qualifying purchases.
How to Treat Reflections in a Small Closet: Step-by-Step
- Identify the first reflection points—these are your biggest echo sources.
- Use the mirror trick: sit in your usual position and hold a mirror against the wall. Where you see your microphone or speakers in the mirror? That’s a reflection point.
- Place acoustic panels or foam at these points. Focus on side walls, ceiling, and behind the microphone.
- Cover the corners with bass traps or foam blocks to absorb low-frequency buildup. This prevents that 'boomy' sound often heard in tiny rooms.
- Repeat the process for other surfaces as needed, prioritizing coverage on the most reflective spots.
In practice, covering 50-70% of the first reflection points often makes a noticeable difference. For example, a YouTuber who added panels at these spots saw a 40% reduction in echo on their recordings.
Understanding why this matters is key: reflections bounce sound waves around the space, creating echo and muddiness that can obscure clarity. By treating first reflection points, you're directly addressing the primary sources of these issues. The tradeoff involves balancing coverage—more panels improve sound but also add cost and complexity. Finding the sweet spot ensures optimal sound without unnecessary expense.

VEVOR Portable Vocal Booth, 6.56 ft Height, Portable Recording Studio with Travel Bag, Mobile Tablet Stand, Thickened Soundproofing, Sound Isolation Booth for Echo-Free Vocals, Podcasts, Voiceovers
Say Goodbye to Echoes: Built with durable Oxford cloth and acoustic padding, this recording booth for the home...
As an affiliate, we earn on qualifying purchases.
As an affiliate, we earn on qualifying purchases.
Sealing Gaps and Doors: Locking Out Unwanted Noise
Gaps around the closet door are the biggest noise leaks. Even a well-treated interior won’t help if outside sound sneaks in or your noise escapes.
Use weatherstripping, acoustic sealant, or a heavy blanket over the door. For a more permanent fix, replace the standard door with a solid-core one or add a door sweep to cut off sound leaks.
Sealing these gaps is crucial because sound naturally travels through openings, undermining your efforts to contain noise. Proper sealing not only reduces external noise but also prevents your own noise from disturbing neighbors or other parts of your house. For detailed sealing techniques, visit sealing and acoustic treatment guides. The tradeoff is that sealing can make access less convenient or slightly reduce ventilation, so plan accordingly. For example, sealing a closet door reduced outside noise pickup by 60%, making voice recordings clearer and less affected by street sounds.
Placement Tips for Your Microphone, Speakers, and Desk
Position your mic and speakers carefully to avoid reflections bouncing off the closet walls. Keep the microphone away from the door or hard surfaces that reflect sound.
Set your desk away from the back wall and corners, where bass and reflections tend to gather. Use a mic stand with a shock mount to minimize vibrations.
For instance, placing the microphone 6-12 inches from the wall and angling it away from reflective surfaces makes vocals sound much warmer and less echoey.
Understanding placement is important because reflections and standing waves can color your sound, making recordings or mixes muddy or harsh. Check out studio equipment and space optimization tips for more. Proper positioning minimizes these issues, leading to clearer, more professional results. The tradeoff involves finding the right spot—too close, and you get proximity effect; too far, and reflections increase. Experimentation yields the best results, but generally, keeping the mic at a moderate distance and angling it away from reflective surfaces strikes a good balance.
Budget-Friendly Tricks to Improve Your Closet Setup
If you’re tight on funds, use blankets, mattresses, or soft furnishings to absorb sound. Cover the walls, door, and even the floor with thick fabric to reduce reflections.
DIY options include hanging moving blankets or using foam mattress toppers. These can cut echo by over 30% without costing a fortune.
Using inexpensive materials like blankets and foam can significantly improve sound quality, but they also have limitations. For more cost-effective solutions, see DIY acoustic treatment ideas. For example, they may not be as durable or effective at blocking low-frequency sounds, which often require specialized bass traps. The key is understanding that these solutions are tradeoffs—cost-effective but less comprehensive than professional treatments. For example, a podcaster used thick blankets and foam panels in their closet and saw a 50% reduction in echo—at a fraction of the cost of professional acoustic treatment.
Common Mistakes That Weaken Your Closet’s Effectiveness
One of the biggest errors is over-treating the space without sealing gaps. You can add all the panels you want, but if sound leaks through the door, it’s pointless.
Another mistake is placing the mic too close to reflective surfaces. Keep it at least 6-12 inches away from walls and corners.
Finally, ignoring ventilation can cause heat buildup, especially if you put a high-power rig inside. Proper airflow is essential to prevent overheating and noise from fans ramping up.
Understanding these pitfalls helps you prioritize where to invest your effort. Over-treating without sealing can lead to wasted resources, while poor placement of your microphone can result in muddled recordings. Additionally, neglecting ventilation can cause equipment overheating, which not only damages gear but can also introduce unwanted noise from cooling fans. The tradeoff involves balancing treatment, noise control, and airflow—ignoring one aspect can compromise the entire setup.
FAQs: Answering Your Most Common Questions
- Is a closet good for recording vocals or podcasts? Yes, if you treat the interior properly. It reduces echo and reflections, making your recordings clearer.
- What’s the difference between acoustic treatment and soundproofing? Treatment reduces inside echoes; soundproofing blocks outside noise from entering or leaving.
- Where should I place acoustic panels in a closet? Focus on the first reflection points—walls facing your mic and the ceiling. Use the mirror trick to find them.
- Do I need bass traps in a closet? If you notice a boomy or muddy sound, bass traps in corners help control low-frequency buildup.
- Will foam panels stop outside noise? No, foam absorbs inside reflections but won’t block external sounds; sealing gaps is necessary for that.
Conclusion
Transforming a closet into a functional recording or AI workspace is about smart placement and targeted treatment. Focus on reducing echoes at the source, sealing gaps, and ensuring proper airflow. That’s what makes a tiny space work, not just slapping on foam panels.
Think of your closet as a mini studio — with the right tweaks, it can produce professional-sounding recordings or house a quiet, powerful AI rig. It’s all about making noise work for you, not against you. Now, go turn that closet into your secret weapon.