
To upgrade your laptop’s RAM and SSD, start by preparing your workspace, gathering the necessary tools, and backing up your data. Carefully open your device following manufacturer instructions, then install compatible RAM modules into the slots and replace or add an SSD securely. Double-check connections, power on your laptop, and verify the new hardware is recognized in BIOS and the OS. If you keep going, you’ll find detailed steps to make the process straightforward and safe.
Key Takeaways
- Prepare tools, workspace, and backup data before opening your laptop to ensure a safe upgrade process.
- Verify compatibility of new RAM and SSD with your device using manufacturer specifications or compatibility tools.
- Carefully open the laptop following disassembly instructions to access RAM slots and SSD bays without damaging components.
- Install compatible RAM modules and SSD securely, then power on to confirm hardware recognition in BIOS and operating system.
- Run system diagnostics and verify the new hardware functions correctly, completing the upgrade with proper system checks.

Crucial 32GB DDR5 RAM Kit (2x16GB), 5600MHz (or 5200MHz or 4800MHz) Laptop Memory 262-Pin SODIMM, Compatible with Intel Core and AMD Ryzen 7000, Black – CT2K16G56C46S5
Boosts System Performance: 32GB DDR5 RAM laptop memory kit (2x16GB) that operates at 5600MHz, 5200MHz, or 4800MHz to…
As an affiliate, we earn on qualifying purchases.
As an affiliate, we earn on qualifying purchases.
Preparing Your Tools and Workspace

Before you begin upgrading your laptop’s RAM and SSD, it’s essential to prepare your tools and workspace. Gather a small Phillips-head screwdriver, an anti-static wrist strap or mat, and a plastic pry tool. Confirm your workspace is clean, flat, and well-lit to prevent losing tiny screws or damaging components. Turn off your laptop and unplug all cables before starting. Keep your workspace organized by designating a small container or tray for screws and parts. Avoid working on carpeted surfaces, as static electricity can harm sensitive electronics. Clear the area of clutter to make the process smoother. Having everything ready and within reach minimizes interruptions and helps you stay focused, making the upgrade safer and more efficient. Additionally, understanding the importance of sustainable and secure solutions can help you approach your upgrade with care for both the environment and data security. Being mindful of proper handling techniques ensures your components remain undamaged throughout the process. It’s also helpful to familiarize yourself with the specific hardware components of your device to avoid any accidental damage. Moreover, paying attention to electrostatic discharge precautions can significantly reduce the risk of damaging sensitive parts during the upgrade. Taking a moment to check your backup procedures can also prevent data loss if anything unexpected occurs.

fanxiang S101 1TB SSD SATA SSD 1TB Internal Solid State Drive SATA III 6Gb/s 2.5" SSD, UP to 520MB/s, 3D NAND TLC, Upgrade Laptop PC and Desktops
SPEED UP COMPUTER: The fanxiang 1TB SSD 2.5 Inch SATA SSD achieves blazing read and write speeds of…
As an affiliate, we earn on qualifying purchases.
As an affiliate, we earn on qualifying purchases.
Backing Up Important Data

Before you start upgrading, make sure to back up your essential files to prevent data loss. Decide whether you want to use an external drive, cloud storage, or another method that works best for you. Taking this step guarantees your important data stays safe throughout the upgrade process. Considering color accuracy during your backup ensures that your visual files are preserved with true-to-life quality. Additionally, being aware of your privacy preferences can help you manage cookies and personal data during the process. To ensure a smooth upgrade, consult hardware compatibility guidelines to avoid potential issues. Checking for storage requirements can help you determine if your current backup method accommodates your data volume, especially when considering website cookies and their impact on your browsing experience.
Backup Essential Files
Backing up your important files guarantees you don’t lose valuable data during the upgrade process. Before proceeding, make certain all documents, photos, videos, and other critical files are securely saved elsewhere. Use an external hard drive, USB flash drive, or cloud storage service to make copies of your essential data. Double-check that your backups are complete and accessible, so nothing gets missed. Organizing your files in folders can make recovery easier later. Remember, even a simple mistake during hardware installation can cause data loss, so taking this step is vital. Ensure you understand the importance of data protection to better avoid potential setbacks. Investing in reliable backup methods can provide added peace of mind during hardware upgrades. Additionally, understanding the power consumption of your devices can help you avoid issues during the upgrade process, especially if your system’s power supply is limited. Being aware of your device’s air quality considerations can also help prevent overheating or dust-related issues during the upgrade. Avoid skipping this process, as it protects you from potential setbacks. Photobombs by children and pets create memorable moments, but during a hardware upgrade, unexpected issues can arise if data isn’t properly saved. Once your files are safely backed up, you can confidently continue with the upgrade, knowing your data is secure.
Choose Storage Method
Selecting the right storage approach for your backups is vital to guarantee your data remains secure and accessible. You have several options to contemplate based on your needs and resources. External drives like HDDs or SSDs offer portability and large storage capacity. Cloud storage provides remote access and automatic backups but depends on internet stability and subscription costs. USB flash drives are compact and quick for smaller files. Think about your data volume, budget, and convenience when choosing a method. Incorporating connected storage options can enhance your backup strategy by integrating seamlessly with your overall home tech setup. Additionally, choosing the right backup devices can help you maintain a healthy data management routine. For example, understanding the field‑of‑view and imaging‑scale of your setup can inform how much data you need to back up regularly. When planning your backups, consider the total cost of ownership, including ongoing maintenance and potential upgrades, to ensure your chosen storage method remains practical over time. Also, evaluating backup frequency ensures your data stays current without unnecessary redundancy.
![ARCTIC EAGLE Anti Static Wrist Strap, 11" Anti Static Wristband Grounding Bracelet with Alligator Clip and Extendable Long Cable, Fits Wrist Circumference 6" to 8.5". [Regular Size]](https://m.media-amazon.com/images/I/31Vfye1fgCL._SL500_.jpg)
ARCTIC EAGLE Anti Static Wrist Strap, 11" Anti Static Wristband Grounding Bracelet with Alligator Clip and Extendable Long Cable, Fits Wrist Circumference 6" to 8.5". [Regular Size]
Protect PC from Static Electricity: Eliminate static electricity from human body in 0.1s to protect your PC from…
As an affiliate, we earn on qualifying purchases.
As an affiliate, we earn on qualifying purchases.
Opening Your Laptop and Accessing Components
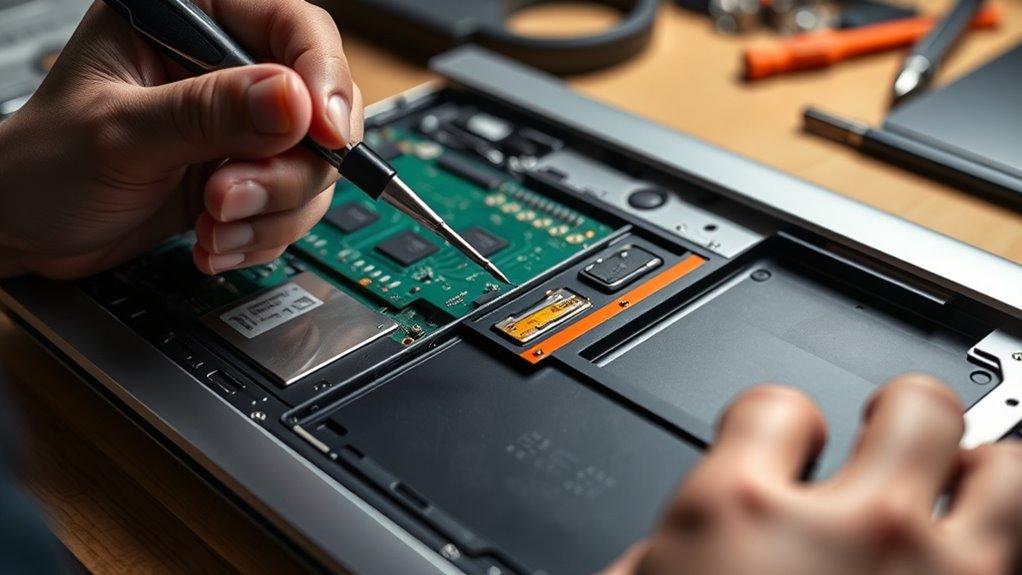
To upgrade your laptop’s RAM and SSD, you’ll need to carefully open the device and access its internal components. Start by powering off your laptop and disconnecting all cables, including the charger. Flip it over and locate the screws on the bottom panel. Use a screwdriver to remove these screws, keeping track of their placement. Gently pry open the panel with a plastic opening tool to prevent damage. Once the cover is off, you’ll see the internal components, including the RAM slots and SSD bay. Handle everything with care, avoiding static electricity by grounding yourself. Take your time to identify the parts you need to access, ensuring you don’t accidentally disconnect any cables or damage delicate components. Additionally, consult your device’s user manual to ensure you follow the correct disassembly procedures specific to your model. Familiarizing yourself with internal components and their layout can help prevent common mistakes during the upgrade process. It’s also helpful to understand the power management features related to your device to ensure proper installation and operation.

JOREST 40Pcs Small Precision Screwdriver Set with Torx Triwing Phillips, Mini Repair Tool Kit for Macbook, Computer, Laptop, PC, iPhone, PS5, Xbox, Switch, Glasses, Watch, Ring Doorbell, Electronics
【Precision screwdriver set】– 40Pcs screwdriver set has 30 CRV screwdriver bits which are phillips PH000(+1.2) PH000(+1.5) PH00(+2.0) PH0(+3.0)…
As an affiliate, we earn on qualifying purchases.
As an affiliate, we earn on qualifying purchases.
Upgrading Your RAM

To upgrade your RAM, you need to choose modules that are compatible with your laptop’s specifications. Proper installation guarantees your new memory works correctly and improves performance. Once installed, verify the upgrade to make sure everything is functioning smoothly.
Selecting Compatible RAM
Before upgrading your laptop’s RAM, it’s essential to guarantee the new modules are compatible with your device. First, check your laptop’s specifications or user manual to find the maximum RAM capacity and supported type. Most laptops use DDR4 or DDR3 RAM, so match the speed and form factor accordingly. Look for the correct pin configuration; for example, desktop modules typically have 288 pins, while laptops often use SO-DIMM modules. You’ll also want to verify voltage requirements to ensure stability. Instead of guessing, use tools like Crucial’s compatibility checker or consult your manufacturer’s website. This way, you avoid installing incompatible RAM that won’t fit or function correctly, saving you time and potential hardware issues down the line.
Installing RAM Properly
Once you’ve confirmed that your new RAM modules are compatible with your laptop, it’s time to install them properly. First, power down your laptop, unplug it, and remove the battery if possible. Locate the RAM slots—usually accessible through a panel on the back. Carefully open the panel and ground yourself to prevent static. To install, align the RAM module with the slot’s notch and press down firmly until it clicks into place. Make sure both sides are securely seated. Here’s a visual to guide you:
| Step | Action |
|---|---|
| Remove the existing RAM | Release clips and lift |
| Align the new RAM | Match notch and slot |
| Secure the module | Press until clicks in place |
Be gentle, and double-check the seating before closing everything up.
Verifying RAM Upgrade
After installing your new RAM modules, ensuring that your system recognizes the upgrade correctly is essential. Start by restarting your laptop and opening the Task Manager (Ctrl + Shift + Esc) on Windows or the Activity Monitor on Mac. Check the memory section to see if the total installed RAM matches what you’ve added. You can also verify through System Information (Windows: type “msinfo32” in the Run dialog; Mac: click the Apple menu, then About This Mac). If the new RAM isn’t showing, double-check that the modules are properly seated and compatible with your system. Running a memory diagnostic tool, like Windows Memory Diagnostic or memtest86, can also help confirm proper operation. Ensuring your system recognizes the upgrade guarantees better performance and stability.
Replacing or Adding an SSD

Replacing or adding an SSD can substantially boost your laptop’s performance, making it feel faster and more responsive. If you’re upgrading, guarantee your new drive is compatible with your device. Adding an SSD can dramatically reduce boot times and improve file transfer speeds. Before starting, back up your data. Use the right tools, and follow your laptop’s disassembly instructions carefully. When installing, secure the drive properly and reconnect all cables. Remember, upgrading might void your warranty if not done correctly. Here’s a quick overview:
| Step | Key Action | Tip |
|---|---|---|
| Choose the right SSD | Match size and interface | Check your laptop’s specs |
| Backup your data | Save important files | Use cloud or external drive |
| Physical installation | Securely mount and connect | Handle components carefully |
| Final check | Power on and verify detection | Confirm the new drive is recognized |
Final Steps: Powering Up and Verifying the Upgrade

Before powering on your laptop after the upgrade, double-check all connections to guarantee the SSD is properly seated and cables are secure. This step ensures your hardware functions correctly and prevents potential issues. Once confirmed, power on your laptop and enter the BIOS or UEFI settings to verify the system recognizes the new hardware. Observe the startup process for any error messages or unusual behavior. Finally, boot into your operating system and check that the new RAM and SSD are functioning properly.
- Run system diagnostics to confirm hardware recognition
- Use system info tools to verify the new RAM size
- Check disk management to see the upgraded SSD status
Frequently Asked Questions
Can I Upgrade My Laptop’s RAM and SSD Simultaneously?
Yes, you can upgrade your laptop’s RAM and SSD simultaneously. Just guarantee your laptop supports the new hardware, and check the specifications for compatibility. Turn off your device, disconnect it from power, and carefully open the back panel. Carefully remove the old RAM and SSD, then install the new components. Take your time, follow static precautions, and you’ll have upgraded your laptop’s performance in no time.
What Are the Signs That My Laptop Needs More RAM?
Your laptop’s performance can feel like trying to run through quicksand if it needs more RAM. You’ll notice it slowing down when juggling multiple apps, frequent freezes, or delays during multitasking. If your system takes longer to boot or apps crash often, these are clear signs you should consider upgrading your RAM. Adding more memory can breathe new life into your device, making everything run smoother and faster.
How Do I Know Compatible RAM and SSD Specifications for My Laptop?
You can find compatible RAM and SSD specifications by checking your laptop’s manual or manufacturer’s website. Look for your laptop model number and search for the official specs, including supported RAM types (like DDR4) and maximum capacity. Use tools like Crucial’s or Kingston’s compatibility checkers by entering your laptop details, ensuring you select the correct form factor, speed, and interface to guarantee compatibility.
Is It Necessary to Update BIOS After Hardware Upgrades?
Yes, updating your BIOS after hardware upgrades is often necessary. It guarantees your laptop properly recognizes new RAM or SSD, improving stability and performance. Manufacturers release BIOS updates to support newer hardware and fix bugs. Check your laptop’s support website for the latest BIOS version. Carefully follow the update instructions to avoid issues, and always back up your data before proceeding. This step helps maximize your upgrades’ benefits and keeps your system running smoothly.
How Long Does the Entire Upgrade Process Typically Take?
The entire upgrade process usually takes about 30 minutes to an hour, depending on your experience and the laptop model. You’ll spend roughly 10-15 minutes opening the case, installing the new RAM and SSD, and reassembling it. Then, you’ll need another 10-20 minutes to boot up, check that everything works correctly, and update any necessary drivers or BIOS. Take your time to avoid mistakes and guarantee a smooth upgrade.
Conclusion
Think of upgrading your laptop’s RAM and SSD as tuning a high-performance engine. With the right tools and careful steps, you’ve boosted your device’s speed and storage capacity. Now, it’s ready to run smoother and faster than ever. Just like a finely tuned engine, your laptop will perform at its best, handling your tasks with ease. Enjoy the newfound power and efficiency, knowing you’ve successfully upgraded your machine yourself.